
Recently I took a big dive into Compute Shaders because I heard that's how you draw lots of grass fast.
 Full disclosure: you're not going to end up with this image at the end of this
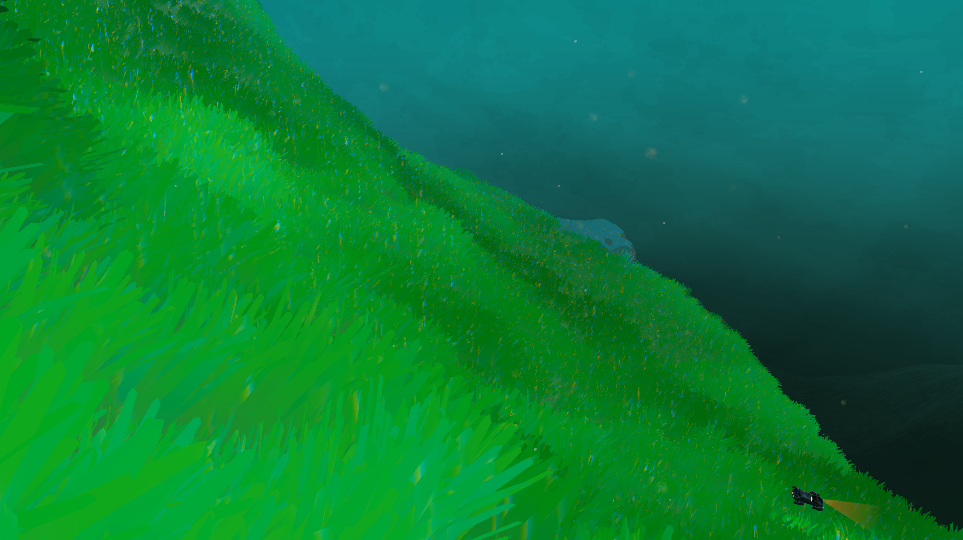
I was looking to improve the visuals of my game Undersea by drawing lots of grass/kelp all over the terrain tiles that make up my world map.
I found a few good resources that I'd recommend to get started using them:
I'll do my best to kind of sum up what I've learned so far and share a bit about how my system works here, but highly recommend reading through the above links as well!
Compute Shaders are a way of running code on the GPU that isn't specifically to draw pixels to the screen. In Unity you write them using normal HLSL shading language so it's quite similar to writing a shader.
When are compute shaders useful? Basically any time you have a big task that can be split up into millions of tiny, indepedent parallel tasks. Indepedent is a key word here, you can think of a compute shader as a ton of workers all doing a tiny part of a task and can't really talk to eachother.
This is a contrived example, but if you wanted to fill a grid with random values, you could iterate across each cell and set the value one at a time. However, none of the cells depend on any of the cells around them, they are totally indepedent. So, instead you could have gridWidth * gridHeight workers all set one cell each at the same time and have the work done in a fraction of the time! That's the basic idea behind compute shaders, as I understand them.
Getting back to the topic of grass, the hard part of drawing a lot of grass is not actually the drawing of the grass. GPUs are very fast these days and can push millions of vertices no problemo. If you gave me a mesh that contained 50k blades of grass and asked me to draw it, I can do that with a single draw call and it's easy!
The hard part is actually acquiring the above 50k blades of grass mesh. Unless your terrain is a single flat plane, the positions of the grass are going to depend on the shape of the terrain, and we also only want to draw grass near the camera where it can be seen.
Ok, so maybe we have a mesh that is a single blade of grass and we call draw on it 50,000 times in random positions around the camera? Unfortunately, telling the GPU to draw something is much slower than the time it takes to actually draw it. Since it takes a while to tell the GPU to draw anything, you want to tell it to draw a lot of stuff at once so it isn't wasting time waiting for your next instruction.
This is where compute shaders can help, because what we need is a really fast way to scatter 50,000 blades of grass around the player and then draw all of those at once.
What does a compute shader look like? This is the smallest one you could write which does nothing.
#pragma kernel MyComputeShader

[numthreads(64, 1, 1)]
void MyComputeShader(uint id : SV_DispatchThreadID)
{
  // Do stuff
}
Pretty much just a normal function with a parameter, and then some weird stuff. The #pragma kernel line at the top is simply declaring that the function named MyComputeShader is a "kernel" which is a weird CS term that basically means it's the main function that's going to run.
The [numthreads(64,1,1)] bit is more important, and tells the GPU how many "thread groups" to use when running this function. A thread group is more or less what it sounds like, a group of threads. From everything that I've read, 64 is the best number to use here, the optimal number depends on the hardware but most things are bucketed in multiples of 32 and 64 seems to be a good compromise.
More specifically, the 3 numbers are the X, Y, and Z counts for thread groups, which essentially a nice way to let you do tasks in 1, 2, or 3 dimensions. In the filling a texture example, you might choose (8, 8, 1), which multiplies out to 64, and gives you a 2-dimensional set of thread groups to handle the 2 dimensional data of the texture.
This becomes relevant with the parameter to the compute shader, uint id : SV_DispatchThreadID. This is the ID of the current thread, which as far as I know is the only value that changes between different threads running our function. In the 2D grid filling example, this id value would become a uint2 with x and y fields to access the relevant IDs. You could then use those ID values to index into the grid at the appropriate coordinate. The range of values that the IDs can be starts at 0 and depends on how many threads the shader is dispatched with, more on that later!
Invoking the shader is pretty simple, you reference the ComputeShader as an asset and then you can just call Dispatch() on it with a few arguments.
public class ComputeShaderExample : MonoBehaviour
{
  [SerializeField] private ComputeShader _computeShader = null;

  private void Start()
  {
    int kernelId = _computeShader.FindKernel("MyComputeShader");
    int threadCount = 200;
    _computeShader.Dispatch(kernelId, Mathf.CeilToInt(threadCount / 64f), 1, 1);
  }
}
This, in the spirit of the empty compute shader example above, runs our empty compute shader with 200 threads which all do exactly nothing. But they do it really quickly!.
The two main things to note here are:
FindKernel. You can actually have as many kernels as you want in your compute shader and bind different inputs to them.Now that we have the basics, lets try to scatter some grass!
So, what we want to do is given some input mesh like a tile of terrain, scatter points on it that will be our 'instance' locations for blades/clumps of grass. Then we can issue a single draw call which draws a grass mesh at all of those locations. The easiest way I could think of to do this is to scatter our grass points based on the geometry of the terrain, perhaps using the vertices/triangles of the terrain mesh as the input points.
To start with, let's get a basic setup working that produces some grass instances and draws them.
Here's an updated version of the empty compute shader from before:
#pragma kernel Scatter

struct InstanceData
{
    float3 Position;
    float3 Normal;
    float Scale;
    float Rotation;
};

AppendStructuredBuffer<InstanceData> _Instances;

[numthreads(64,1,1)]
void Scatter(uint id : SV_DispatchThreadID)
{
    InstanceData data;
    data.Position = float3(0, 0, 0);
    data.Normal = float3(0, 1, 0);
    data.Scale = 1;
    data.Rotation = 0;

    _Instances.Append(data);
}
Buffers are just arrays that sound cool
InstanceData is the structure that represents a single blade of grass. The AppendStructuredBuffer is an array of those grass instances that we'll write the scattered points to.
We can really put anything in the InstanceData that we want, the most important piece of information is probably the position. The normal scale, and rotation seem like probably useful things to output as well. The rotation is left as just a single float since we'll probably just rotate the grass around its Y axis.
Currently, this does no scattering and just outputs the same instance data every time this function is called, but I think it's going to be a lot more fun to work on this if we get something drawing ASAP so we're gonna move on to the next step for now.
We'll need to add a few things to the basic C# example I showed before in order to properly call this compute shader and use the instance data to do a draw call.
The script is going to need a reference to the mesh we want to instance (a blade of grass for instance, or a quad, etc), the material to draw it with, and a couple buffers.
public class ComputeGrass : MonoBehaviour
{
  [SerializeField] private ComputeShader _computeShader = null;
  [SerializeField] private Mesh _grassMesh = null;
  [SerializeField] private Material _grassMaterial = null;

  private ComputeBuffer _drawArgsBuffer;
  private ComputeBuffer _instanceBuffer;
  private MaterialPropertyBlock _materialProps;
  private uint[] _drawArgs;
  private int _kernelScatterId;

  private const int kMaxInstanceCount = 100;
If you don't like underscores on private fields you're wrong but also they are optional
The _drawArgsBuffer ComputeBuffer is going to be used to pass arguments to Graphics.DrawMeshInstancedIndirect, and the _instanceBuffer is what's going to actually contain the array of InstanceData from our compute shader.
Next we'll initialize these fields in the Start() method.
private void Start()
{
  // Argument buffer for the indirect draw call
  _drawArgs = new uint[5]
  {
    _grassMesh.GetIndexCount(0),
    0,
    _grassMesh.GetIndexStart(0),
    _grassMesh.GetBaseVertex(0),
    0
  };

  _drawArgsBuffer = new(5, sizeof(uint), ComputeBufferType.IndirectArguments);
  _drawArgsBuffer.SetData(_drawArgs);

  // The instance buffer contains all our instance data
  // The buffer must be initialized with the exact size of the instance data struct
  _instanceBuffer = new ComputeBuffer(kMaxInstanceCount, sizeof(float) * 8, ComputeBufferType.Append);

  _kernelScatterId = _computeShader.FindKernel("Scatter");
  _materialProps = new();
}
Here we create the draw arguments array, which contains some information about the mesh to be instanced, and will also contain the number of instances to draw (at index 1, currently left at zero). At some point the number of instances drawn is going to depend on what happens in our compute shader, so we're going to leave it at zero and let the compute shader fill it for us.
Next we create the instance buffer. It's super important that the size of the buffer matches exactly the size of the struct otherwise really bad stuff will happen. There may be some better way to calculate this automatically, but for now I just put that there are a total of 8 floats in the struct (two float3's and 2 floats).
The buffer has a max size, which we'll increase by a lot later, this is how many instances total we can ever draw.
Ok, the last part is the Update method where we run the compute shader and make the draw call!
private void Update()
{
  // Reset the counter before running the compute shader
  _instanceBuffer.SetCounterValue(0);

  // Bind the instance buffer to the compute shader and run the shader
  _computeShader.SetBuffer(_kernelScatterId, "_Instances", _instanceBuffer);
  _computeShader.Dispatch(_kernelScatterId, 100, 1, 1);

  // Copy the number of instances added to the buffer to the draw arguments at index 1
  ComputeBuffer.CopyCount(_instanceBuffer, _drawArgsBuffer, sizeof(uint));

  // Bind the buffer to the material for drawing
  _materialProps.SetBuffer("_Instances", _instanceBuffer);

  // Make the instanced draw call
  // The bounds are used for frustum culling, however a quirk is that the bounds center is also
  // added to the instance positions by Unity for some reason, so for now since the grass will likely never
  // be fully out of the frustum we just make a bounds that is always inside the camera frustum with a center
  // at the origin for simplicity
  Bounds drawBounds = new Bounds(Vector3.zero, Camera.main.transform.position * 2);
  Graphics.DrawMeshInstancedIndirect(_grassMesh, 0, _grassMaterial, drawBounds, _drawArgsBuffer, 0, _materialProps);
}
There's a couple things going on here worth mentioning. One is that we use this "counter" feature which is built into the instance buffer. This is how we track how many instances were appended to the instance buffer during the compute shader.
After we reset the counter and link the instance buffer to the compute shader, we invoke it with the Dispatch() method. Note that we're just passing in 100 as a kind of random number of thread groups to use. This is going to change later but again we're just trying to get something on the screen quickly.
When we call Dispatch, the compute shader runs synchronously and blocks the c# execution until it's complete. After it's done, we can copy the instance count to our argument buffer, set the instance buffer on our material, and make the draw call.
The draw call takes a bounds which it uses for frustum culling. As I noted in the comment, the bounds parameter has a surprising quirk which is that it seems to also be used as a transform to the instanced mesh. For my purposes, the grass is basically never going to be culled as it will always be on screen, so for simplicity I pass in a bounds with a center at the origin.
If you want to utilize the frustum culling, you might need to pass in an additional Vector3 to the compute shader equal to -drawBounds.center to undo that transform, or otherwise change how you are calculating positions to be in local space of the bounds.
Here's the whole C# side so far:
using UnityEngine;

public class ComputeGrass : MonoBehaviour
{
  [SerializeField] private ComputeShader _computeShader = null;
  [SerializeField] private Mesh _grassMesh = null;
  [SerializeField] private Material _grassMaterial = null;

  private ComputeBuffer _drawArgsBuffer;
  private ComputeBuffer _instanceBuffer;
  private MaterialPropertyBlock _materialProps;
  private uint[] _drawArgs;
  private int _kernelScatterId;

  private const int kMaxInstanceCount = 100;

  private void Start()
  {
    // Argument buffer for the indirect draw call, has info about the mesh to be drawn
    // the second value will be filled with the instance count
    _drawArgs = new uint[5]
    {
      _grassMesh.GetIndexCount(0),
      0,
      _grassMesh.GetIndexStart(0),
      _grassMesh.GetBaseVertex(0),
      0
    };

    _drawArgsBuffer = new(5, sizeof(uint), ComputeBufferType.IndirectArguments);
    _drawArgsBuffer.SetData(_drawArgs);

    // The buffer containing all our instance data
    // The size must be exactly the size of the instance data struct in the shader
    _instanceBuffer = new ComputeBuffer(kMaxInstanceCount, sizeof(float) * 8, ComputeBufferType.Append);

    _kernelScatterId = _computeShader.FindKernel("Scatter");
    _materialProps = new();
  }

  private void Update()
  {
    // Reset the instance counter before running the compute shader
    _instanceBuffer.SetCounterValue(0);

    // Set base params
    _computeShader.SetBuffer(_kernelScatterId, "_Instances", _instanceBuffer);

    // Run the compute shader which will fill the instance buffer
    _computeShader.Dispatch(_kernelScatterId, 100, 1, 1);

    // Copy the number of instances to the draw arguments at index 1 (1 uint offset)
    ComputeBuffer.CopyCount(_instanceBuffer, _drawArgsBuffer, sizeof(uint));

    // Now we draw the instances, first set the buffer on the material property block
    _materialProps.SetBuffer("_Instances", _instanceBuffer);

    // The bounds are used for frustum culling, however a quirk is that the bounds center is also added
    // to the instance positions by Unity for some reason, so for now since the grass will likely never be fully out of the frustum
    // we just make a bounds that is always inside the camera frustum with center at the origin for simplicity
    Bounds drawBounds = new Bounds(Vector3.zero, Camera.main.transform.position.AsAbsoluteValues() * 2);

    // Make the actual instanced draw call
    Graphics.DrawMeshInstancedIndirect(_grassMesh, 0, _grassMaterial, drawBounds, _drawArgsBuffer, 0, _materialProps);
  }
}
Finally, before we can see anything get drawn, we have to use a shader which supports drawing things using our buffer of InstanceData. There are multiple ways to do this, I'm going to demonstrate how to do it with Shader Graph as that is probably the most "golden path" way of making shaders in URP that are compatible with all the lighting features in Unity.
To do this, first create a new lit Shader Graph. I called mine Grass.
 Empty lit shader graph
To get the basics working, we need to somehow use our buffer of InstanceData in this shader to affect the position of each instance. Right now, the Vertex shader is just using the regular object space positions of each mesh vertex. This shader is effectively going to be run a bunch of times, one for each instance that we draw.
Unity provides an "Instance ID" node which gives us the index of which instance is being drawn. We'll use that to index into the _Instances buffer that we're setting on the material.
At the time of writing, Shader Graph does not have native support for using StructuredBuffers, so we have to use a "custom function" node which basically lets us include an HLSL file inside a node.
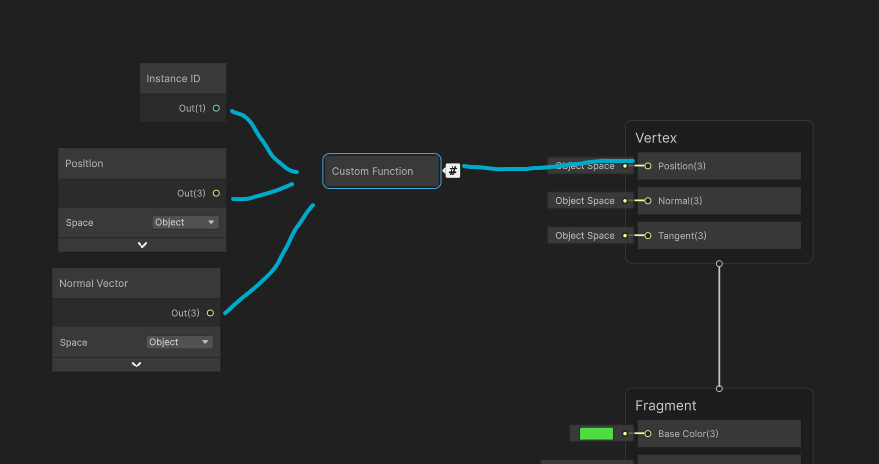 This is the dream
Shown above is basically what we're aiming for. We need some custom function that we pass the instance id, the vertex position and normal to, and it transforms that vertex data using our instance data.
To do this, make another file called something like GrassShaderInclude.hlsl.
struct InstanceData
{
    float3 Position;
    float3 Normal;
    float Scale;
    float Rotation;
};

StructuredBuffer<InstanceData> _Instances;

void ApplyInstanceData_float(uint instanceId, float3 positionOS, float normalOS, out float3 instancePosition, out float3 instanceNormal)
{
    InstanceData data = _Instances[instanceId];

    // Offset the quad by half a unit so its base is on the ground
    positionOS.y += 0.5;

    // Create a rotation matrix to rotate the grass based on the normal
    float3 up = data.Normal;
    float3 forward = float3(sin(data.Rotation), 0, cos(data.Rotation));
    float3 right = normalize(cross(up, forward));
    forward = cross(right, up);
    float3x3 rotMatrix = float3x3(right, up, forward);
    float3 rotatedVert = mul(positionOS * data.Scale, rotMatrix);

    instancePosition = rotatedVert + data.Position;
    instanceNormal = data.Normal;
}
There's more info on custom functions in the Unity Docs, but I'll describe what I understand.
The function name has to be suffixed with the precision it is written for (either half or float), In our case we're using float. Above the function definition you can include additional uniform inputs for the shader, which is how we add the instance buffer as an input.
Note also that I copied the InstanceData struct declaration here. In real life this should probably be another include file that gets included in both the compute shader and this file so that they don't get out of sync. In this case I'm just copy pasting it for tutorial simplicity.
In the actual function, we take in an instanceId, and output the position and normal for that instance. The instanceId is how we know which index to look at in our instance buffer.
The function basically just takes the input vertex position (in object space), transforms it by the rotation defined by the normal vector and our custom Rotation float, and outputs those two vectors.
I'm also translating the input vertex up by 0.5, with the assumption that we'll be using the default Quad mesh which is 1 unit in size, and we want its origin to be at the bottom.
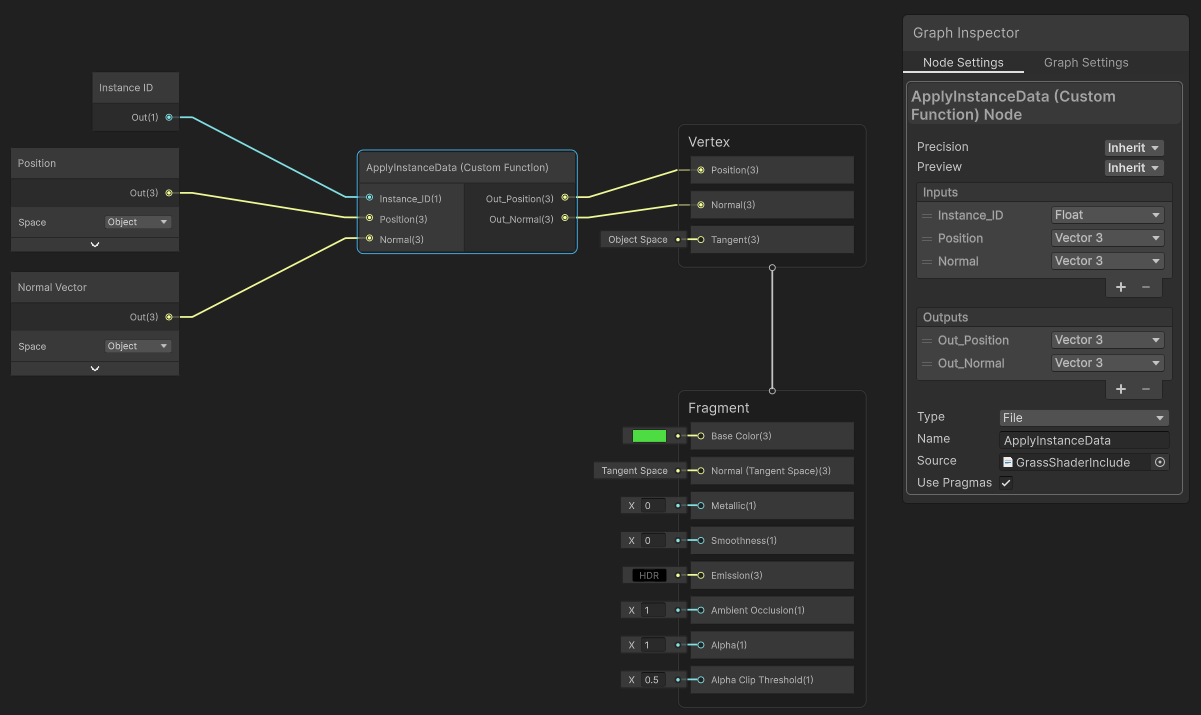 Setup up the custom function node
Once that's written, we can configure out custom function node. Link the node to the HLSL include file, and put the function name in the Name field. The name here excludes the _float suffix. Then we have to manually enter in the parameters the node takes to match the parameters to the function, though the names can be whatever you like.
Note that the InstanceID is marked as a float here, as uint is not an option. I guess this is fine? It's a little weird but I believe this is how you're meant to use it.
Once these are all linked up, we should be able to finally see something!
To setup the test scene, just a few quick steps are needed:
ComputeGrass script on it. The material for the plane mesh itself doesn't particularly matter
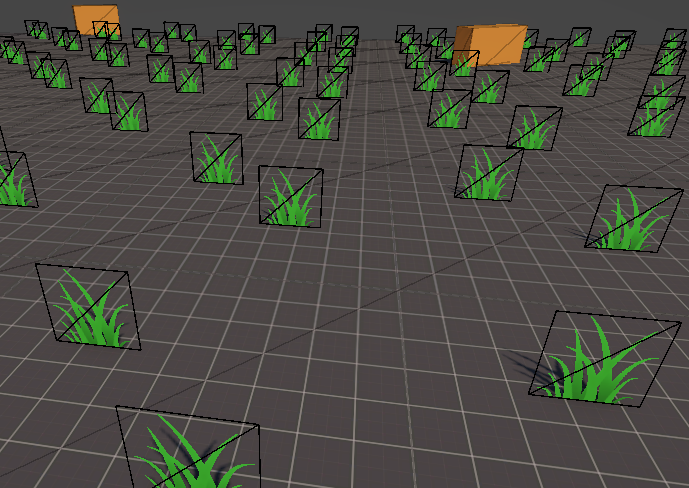
If all goes well, you should see an untextured quad sitting at the origin of the scene, both in the game camera and in the scene view.
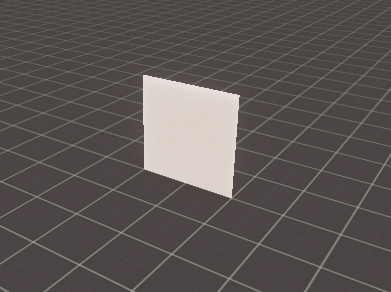 If you squint it still doesn't look like grass
Actually, it isn't a quad, it is 100 quads sitting on top of eachother because we told the compute shader to create 100 instances. And boy howdy are they getting drawn fast.
Ok, we finally have something being drawn, so let's go back and make this actually interesting.
Probably the first glaring issue is that this doesn't look like a grass, it looks like a white square. We can quickly modify the shader to be a bit more interesting.
Using the sprites in Kenney's fantastic foliage pack we can add a couple nodes to the shader to sample a texture and use alpha clipping, then tint the whole thing green or whatever your heart desires.
 Adding a couple nodes to sample the texture and tint the output
This is not a beginner's shader graph tutorial, so I'm not going to explain every little thing, as a quick overview I added 2 material parameters to the graph (color and texture) over in the left panel. You also need to be sure to enable alpha clipping in the graph settings pane within the graph inspector window.
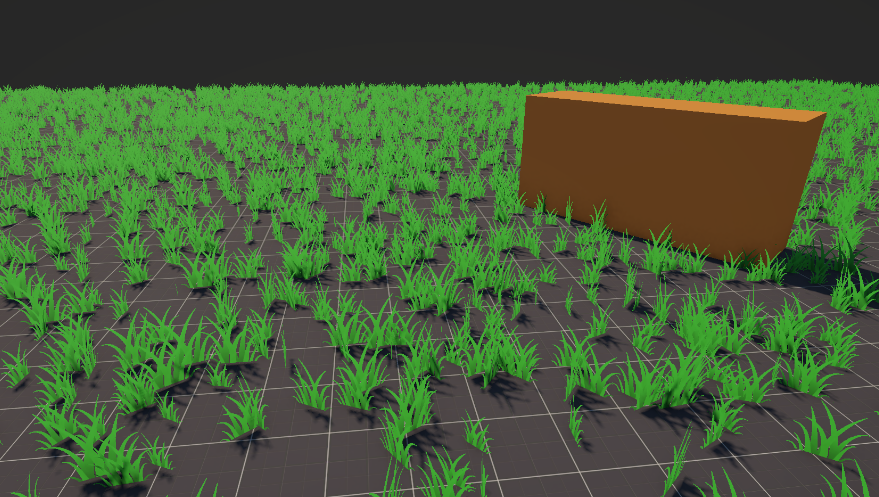
With that, our quad is now grass!
![]() Thank you Kenney for your beautiful grass sprites
Thank you Kenney for your beautiful grass sprites
The next thing that seems rather un-grasslike about our grass is that there is just one, and grass is usually a lot.
To do this, we have to actually pick different positions for each instance inside the compute shader. There are a lot of potential ways we could pick grass positions, I'm going to focus on a method of scattering positions based on an input mesh.
Depending on your usecase, you might want a different method, for example if all your grass exists on a single plane, then there's no need to use a mesh to scatter them, you can just pick random positions on a 2D plane.
For my purposes, I want the grass to scatter on a 3D terrain, so the simplest option seems like picking positions on the triangles of the terrain mesh.
In order to scatter instances on the terrain, we have to pass the mesh data to the compute shader.
We'll need to add these inputs to ComputeGrass.compute:
StructuredBuffer<float3> _TerrainVertices for the mesh verticesStructuredBuffer<float3> _TerrainNormals for the mesh normalsStructuredBuffer<uint> _TerrainIndices for the mesh indicesuint _TriangleCount so we know how many indices there arefloat4x4 _TerrainMatrix to transform the instance positions by the position of the meshStructuredBuffer's are like immutable versions of the AppendStructuredBuffer that we store the InstanceData in. They are essentially just plain arrays.
To pass these things to the compute shader, we have to grab all that data off the input mesh on the C# side.
Create ComputeBuffer fields for the 3 new buffers we're adding, and initialize them like this:
  // In ComputeGrass.Start()
  Mesh mesh = _terrainMesh.sharedMesh;
  Vector3[] verts = mesh.vertices;
  Vector3[] normals = mesh.normals;
  int[] indices = mesh.triangles;

  _triangleCount = indices.Length / 3;
  _instanceBuffer = new ComputeBuffer(kMaxInstanceCount, sizeof(float) * 8, ComputeBufferType.Append);
  _terrainVertexBuffer = new ComputeBuffer(verts.Length, sizeof(float) * 3);
  _terrainNormalBuffer = new ComputeBuffer(normals.Length, sizeof(float) * 3);
  _terrainIndexBuffer = new ComputeBuffer(indices.Length, sizeof(int));

  _terrainVertexBuffer.SetData(verts);
  _terrainIndexBuffer.SetData(indices);
  _terrainNormalBuffer.SetData(normals);
I've added a Mesh field to the script called _terrainMesh, which is the mesh that we're scattering grass on. Then I'm grabbing all the relevant mesh data from it, and storing it in compute buffers. Note how each one needs to be initialized with the correct "stride", aka the size of a single element.
Then we have to set those buffers on the compute shader before dispatching it in Update().
// ComputeGrass.Update()
// Set base params
_computeShader.SetBuffer(_kernelScatterId, "_Instances", _instanceBuffer);
_computeShader.SetBuffer(_kernelScatterId, "_TerrainVertices", _terrainVertexBuffer);
_computeShader.SetBuffer(_kernelScatterId, "_TerrainIndices", _terrainIndexBuffer);
_computeShader.SetBuffer(_kernelScatterId, "_TerrainNormals", _terrainNormalBuffer);
_computeShader.SetMatrix("_TerrainMatrix", _terrainMesh.transform.localToWorldMatrix);
_computeShader.SetInt("_TriangleCount", _triangleCount);
_computeShader.SetInt("_InstancesPerTriangle", kInstancesPerTriangle);

int candidateCount = _triangleCount * kInstancesPerTriangle;
int groupsScatter = Mathf.CeilToInt(candidateCount / (float)_threadCountScatterX);
_computeShader.Dispatch(_kernelScatterId, groupsScatter, 1, 1);
In real code I'd recommend using Shader.PropertyToId to cache the string property name lookup
Finally, before we were just arbitrarily passing in 100 as the number of threads to run. Now we want to use a variable number of threads depending on how many triangles there are and how many grass instances we want per triangle.
int candidateCount = _triangleCount * kInstancesPerTriangle;
int groupsScatter = Mathf.CeilToInt(candidateCount / 64f);
_computeShader.Dispatch(_kernelScatterId, groupsScatter, 1, 1);
The candidate count is the total number of instances we want to create, which is divided by 64 because our compute shader has been defined to do work in chunks of 64 threads. For future proofing you can use _computeShader.GetKernelThreadGroupSizes() to dynamically retrieve the 64 value rather than hardcoding it.
Now, as another stopgap let's just put an instance at the center of every triangle of our mesh.
[numthreads(64,1,1)]
void Scatter(uint id : SV_DispatchThreadID)
{
    uint triIndex = id % _TriangleCount;
    uint i0 = _TerrainIndices[triIndex * 3 + 0];
    uint i1 = _TerrainIndices[triIndex * 3 + 1];
    uint i2 = _TerrainIndices[triIndex * 3 + 2];

    float3 n0 = _TerrainNormals[i0];
    float3 n1 = _TerrainNormals[i1];
    float3 n2 = _TerrainNormals[i2];

    float3 v0 = _TerrainVertices[i0];
    float3 v1 = _TerrainVertices[i1];
    float3 v2 = _TerrainVertices[i2];

    float3 pos = (v0 + v1 + v2) / 3.0;
    float3 normal = normalize((n0 + n1 + n2) / 3.0);
    float3 worldPos = mul(_TerrainMatrix, float4(pos, 1)).xyz;
    float3 worldNormal = normalize(mul((float3x3)_TerrainMatrix, normal));

    InstanceData data;
    data.Position = worldPos;
    data.Normal = worldNormal;
    data.Scale = 1;
    data.Rotation = 0;

    _Instances.Append(data);
}
Picking the triangle is pretty easy. We know that id is going to be the ID of the current thread, which starts at 0 and increases to the total number of threads run. So a simple way of picking the triangle is to modulo the ID by the number of triangles.
The triangle indices start at the triangle index multiplied by 3, and there's always 3 indices per triangle.
Then we grab the vertex data of the selected triangle, and choose a position at the center of that triangle by averaging the 3 vertices/normals. Note that we're also transforming the vertex by the terrain matrix so the grass sticks to the mesh regardless of its position/rotation/scale.
Using this approach, we should now see some beautifully regular rows of grass neatly positioned in the center of our mesh.
 A beautiful and efficiently rendered garden
We're so close to something resembling grass now, we just need a little irregularity. Right now we're picking the center of each triangle, but what would be better is to pick a random position inside the triangle.
This is another case where there are a ton of ways to do this and we're going to pick a pretty simple and probably not the best way, but it will be good enough!
First we need a way to generate a pseudo-random number in the shader. Generally you need some kind of hash function that uses big prime numbers. I don't know anything about how this stuff works so I just copied a hash function off the internet.
uint Hash(uint v)
{
    v ^= 2747636419u;
    v *= 2654435769u;
    v ^= v >> 16;
    v *= 2654435769u;
    v ^= v >> 16;
    v *= 2654435769u;
    return v;
}
It's convenient to also have these random methods that use the hash:
float Random(uint seed)
{
    return float(Hash(seed)) / 4294967295.0; // 2^32-1
}

float RandomRange(uint seed, float min, float max)
{
    return Random(seed) * (max - min) + min;
}
The Hash returns a pseudo random value up to max uint which is why we divide by 2^32-1 to get a random value between 0 and 1.
Now we just need to change how we're choosing the vertex position to be a random point on the triangle rather than just the center.
First we'll create a seed value based on the current id. This is another case where the exact math isn't too important for now, there's tons of ways to generate a seed but the main important thing is that there is not a super perceptible pattern of seed values that correspond to the triangle index.
uint seed = triIndex ^ id;
Using that seed, we'll generate a random position on the triangle using barycentric coordinates.
uint seed = triIndex ^ id;
float r1 = Random(seed * 13);
float r2 = Random(seed * 47);
float sqrtR1 = sqrt(r1);
float randA = 1 - sqrtR1;
float randB = sqrtR1 * (1 - r2);
float randC = sqrtR1 * r2;

float3 pos = v0 * randA + v1 * randB + v2 * randC;
float3 normal = normalize(n0 * randA + n1 * randB + n2 * randC);
We're multiplaying the seed by various prime values where appropriate so that we don't get the same random value for both inputs.
Then we can also use the random method to randomize the scale and rotation of each instance.
float3 worldPos = mul(_TerrainMatrix, float4(pos, 1)).xyz;
float3 worldNormal = normalize(mul((float3x3)_TerrainMatrix, normal));

InstanceData data;
data.Position = worldPos;
data.Normal = worldNormal;
data.Scale = RandomRange(seed, 0.25, 0.5);
data.Rotation = Random(seed) * 6.283;
Pick whatever values you want! Our shader is expecting the rotation to be in radians, which is why I'm multiplying it by 2*pi. These would be good values to make into tweakable parameters to the shader.
One last thing: We previously had a max instance count of 100 defined in our C# script. Let's up that to something more reasonable like ONE MILLION. We can also set the instances per triangle to whatever we like, at my scale it seems like 60 produces a nice dense field of grass.
private const int kMaxInstanceCount = 1_000_000;
private const int kInstancesPerTriangle = 100;
In C# you can write literal numbers separated by _ for readability!
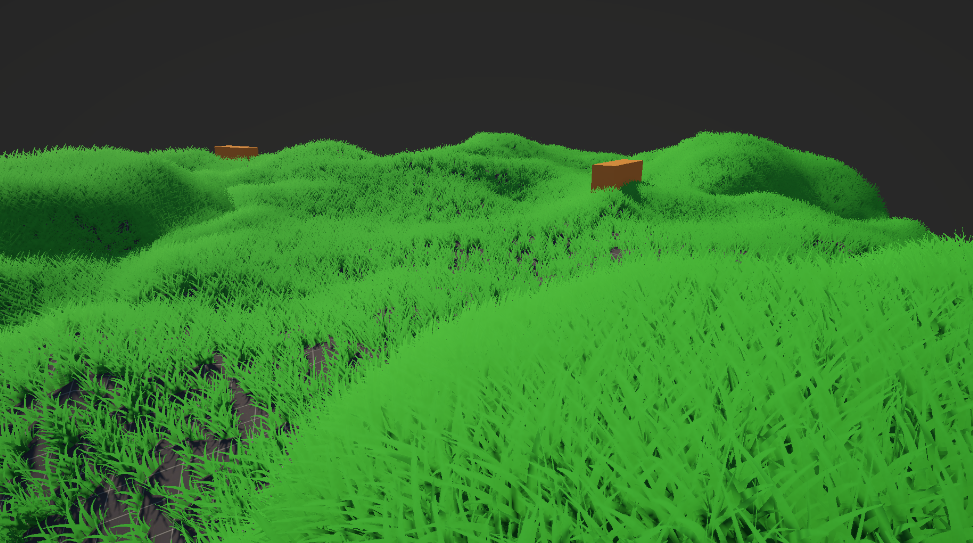
If everything goes to plan, you should get something like this now when you hit play:
 Yep, it's grass
If you don't see something like this, or you don't want to try to piece bits of code together that I lazily part screenshotted and part pasted into this article, I've (also lazily) put the full code in this gist for your convenience.
And here is the final shader graph for the grass:
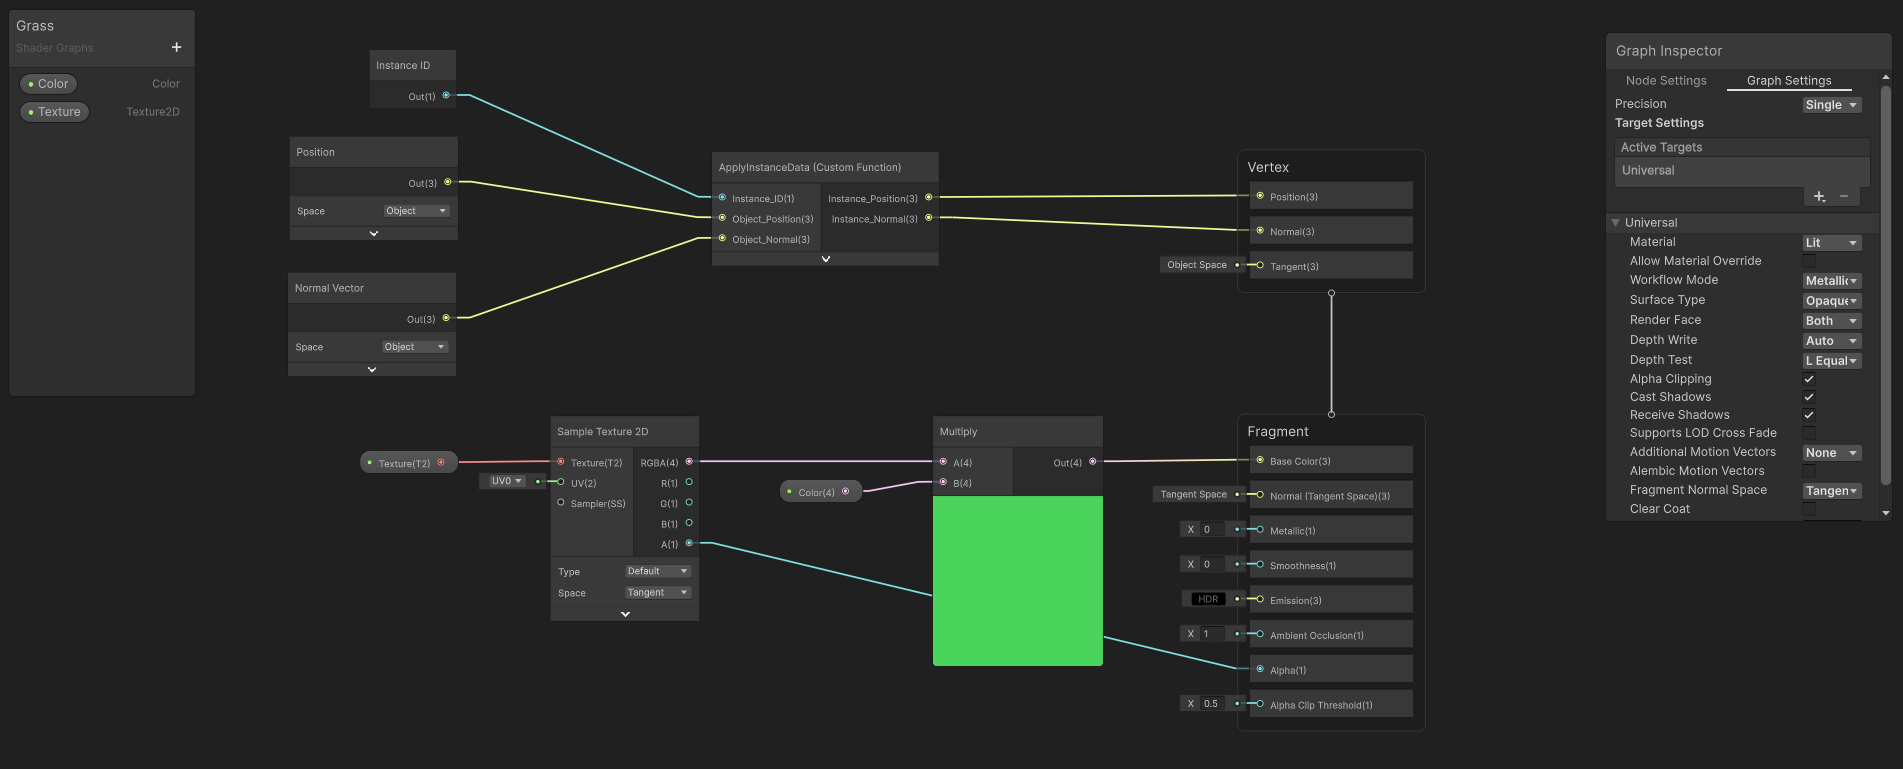 I hate that there is no good non-screenshot way to share these things
As a bonus, try changing the mesh used for terrain to something more exciting like a scaled up blender monkey.
 You'd never guess this was a monkey
This is getting quite long and frankly when I started writing this post I thought it would just be quick overview of how I'm doing grass but ended up going more in depth than intended!
There is a lot that I didn't cover yet which perhaps could be separate posts, but just some food for thought:
Thanks for reading, and happy grass scattering!